


Two things...
1. A Cricut is really helpful in making party deco.
2. Hobby Lobby & Dollar Store are your friend.
You can find the picture loaded post about
my baby's 1st birthday Princess Party here.
And the reason I'm posting my how-to's?
Because I love visiting Party blogs...
but they rarely tell you HOW to make what they display.

In this post, I'll be showing you the how-to's on making:
Invitations,
Cake/Cupcake Toppers/Princess Wands,
a Birthday Banner,
Pom-poms,
a Photo Board.

(This is a picture of it, so I could show the glitter on it, too.)
The invitations... This was so easy! Just made it in Microsoft Word, sent it to Staples to copy, then add the "bling" at home. :)
Onto a little more challenging craft! The cake toppers/ princess wands.

Supplies: At Hobby Lobby, in the cake section, you'll find lollipop sticks. And in the wood department you'll find tiny wooden dowels. And in the scrapbook section, you'll need to buy tons (20ish of patterned/ 10 of cardstock maybe? I had to go back several times!) of 12x12" paper- - coordinating, and solid papers. Try to get the paper during one of their 1/2 off sale weeks. You'll also need a hot glue gun, and preferrably a Cricut. Glitter is optional, as well as any other embellishments you might want.
Instructions:
1) For the large Cake Topper- Cut 1- 5 1/2" circle of the patterned paper, then 2- 5" circles of the solid cardstock; and a 4" number from patterned paper, as well as 1 1/4" flowers. For each cupcake topper- Cut 1- 2 1/2" circle from patterened paper, then 2- 2" circles of solid paper; and a 1 1/2" number, as well as a 1" flower from the patterned paper.
2) Assembly: Back- using the lollipop sticks, place the patterned paper, then lollipop stick on the back side, then 1 of the cardstock circles... using the hot glue gun glue the stick to the patterned paper, then glue the cardstock circle onto the patterned paper, adding a little extra glue to where the stick is. Front: glue other cardstock circle to the front; add the number & flowers/embellishments with hot glue as well. DONE!
2) Assembly: Back- using the lollipop sticks, place the patterned paper, then lollipop stick on the back side, then 1 of the cardstock circles... using the hot glue gun glue the stick to the patterned paper, then glue the cardstock circle onto the patterned paper, adding a little extra glue to where the stick is. Front: glue other cardstock circle to the front; add the number & flowers/embellishments with hot glue as well. DONE!


3) For the wands, (seen in the picture above the supply list), follow the same instructions, only use small dowel rods instead of lollipop sticks. I also tied a ribbon around the small dowel, then embellished with a glitter swirl.

Supplies: Paper Cutter/Scorer; Scrapbook paper; Hot glue gun; Ribbon.
Instructions:
1) Cut your patterened paper into 2" strips. (You'll get 6 out of one 12x12 piece of paper, but only 3 letters). Using the Cricut, cut 3" circle of patterned paper, and then a 3" circle of scrap paper/cardstock for the backing. Using Cricut, Cut letters out- or you could use 2 or 2 1/2" chipboard letters!!
2) Using scorer, score 2" strips every 1/2" across the paper. This is a good "mindless watching TV" kind of task. It'll take forever. Don't say I didn't warn you! :)
3) Using hot glue gun, glue 2 scored papers together. They will probably turn inside out as you glue. That's ok. They'll fan out once you put the circles on. So, go ahead, once you've hot glued all your scored papers together... and glue the front circle on, making sure to get the nooks & crannies and the back of your circle really good with the hot glue. Then glue your letters on.
4) Almost finished! Next glue your ribbon on to the back before you put the back circle on. I estimated the space between each letter. And it turned out just fine. I did leave a ton of ribbon on either side of the letters to tie it with. Once the ribbon is attached, then glue on the scrap paper circle. Whew! You made it! You're finished!!

To go with that beautiful banner, don't you want some pom-poms?
These are EASY! Phew! After that last one, I'll bet you were beginning to wonder if I'd lost my mind! lol. If you haven't made pom-poms... be prepared to LOVE them! And they create such a "wow factor", and they're cheap... it doesn't get much better than this.
Supplies: Varying colors of tissue paper, Fishing wire, small amount of floral wire, scissors.
Instructions:
1) Using 7 pieces of tissue paper, lay them out, and fold with 7 folds about 1" wide. Fold in half to find the center.
2) Using floral wire, wrap around the center, then twist- make a loop to hang your fishing wire from as well. Snip with scissors, or better yet a wire cutter.
3) At this point, I suggest tying on a long piece of fishing wire to hang them from. It'll save you from having to dig through tissue paper to find the little loop to tie it up later. Then, using scissors, cut ends to resemble flower petals.
4) Now the fun begins! Start gently pulling each layer out until it forms a ball. You can kind of fluff them as you go, too. Wow! These are so cool. I love them. I'm hanging these in my baby's room, now that her party is over. :) Oh, and I had my hubby put two little eye hooks into the ceiling, suspended fishing wire taut from each of them, then hung the pom-poms from the eye hooks, and the fishing wire.

My mom, Grammy, made the pom-poms. She's so awesome like that!

Fluffing.

And the total "Wow Factor"!
And the last one... the Photo Board!

This one was especially fun to make. I enjoyed using the power staple gun sooo much! Umm... can I get a pink one just for me? The rush that comes from using one- woot. :)
Supplies: 1- 1x1x8 piece of wood, cut into 2- 1 1/2foot sections, and 2- 2 1/2foot sections; fabric for the board, approx. 1 yard; ribbon or something to hang the pictures from... and I ended up using *ahem* duct tape!! (oh, man, I've become such a redneck! lol.), and pictures.

(My 1st time with a power staple gun!) Sorry for the grungy pic.
Instructions:
1) Staple your pieces together 3 times on each joint, on both sides. I didn't realize that one at first, and wondered why it was so wobbly.
2) Staple your fabric on, making sure to pull it tightly, and "miter" the edges like you would a birthday present.

3) Staple on your ribbon to hang the pictures. Although, my pictures wouldn't stay onto the fringe I'd used because it was elastic-y... I think it would've been fine on grosgrain ribbon or something like that without a give. Add your photos. If you must- - follow me in being a redneck- - and use some duct tape to keep the pictures on. :) Enjoy! I plan to rotate out the pictures frequently, and display it in the baby's room. :)
Also, I didn't add a tutorial, but you probably saw that 3-tiered stand on the food table... you can use the tutorial on this post to make one, too!

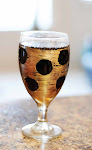
Oh, and while I'm at it, I'll post my recipe for the "Pink Fluff" fruit dip. I know at least one of my friends that will be happy I did! :)
Pink Fluff Dip

Ingredients:
-1 container Strawberry Philly Cream Cheese spread
-1 small container Marshmallow Creme
Directions:
1) Mix together until smooth.
2) Serve with fruit.
That's it! So easy, and soooo yummy! Enjoy.
I also made her dress for the party. Here's the post with the tutorial.

And the Dollar Store came in handy for the game, dress-up jewels, & the mirror craft!

I hope that this very long post about what we did to make the "perfect Princess party" will be helpful. Let me know if you have any questions!
Linking to:

And other parties too! Look at my sidebar "Party" box.
You'll find me at a lot of these link parties this week!
You'll find me at a lot of these link parties this week!


28 comments:
Wow Sarah, what a shindig! I LOVE the pom poms! They look gorgeous! I used to make that fruit dip all the time, but one of my kids has a dairy allergy. poo.
You are an amazing mama girl;) All the decos, food, and fun was to die for ..nice
Absolutely dazzling party!
Your pom poms are out of this world! Love it...visiting from Under the Table. :O)
I LOVE that banner! It looks like it took forever, but it's gorgeous! Great job!
Thanks for linking at Lucky Star Lane!
Love this party, especially the cupcake liners on the sign! Everything looks just perfect!
What a cute idea for a party! You did a great job!
SO stinkin' cute!! I don't have a cricut or a Hobby Lobby. Guess I'm moving and spending some moolah! :) (Because I'm pretty sure my baby girl needs a princess party....in December!)
So so cute. The banner and pom-poms are just perfect, I love pink!
That is the prettiest princess party I have ever seen! I love the wands and the banners and, well, everything! What a lucky little girl.
Thank you for linking this to A Little Craft Therapy with Life in the Pitts
I'm a new Follower From Thursday's Treasures Link Party! Visit me at http://www.rockindeals4you.com/?p=1398 and sign up for my newest giveaway!
Love it all!
Look at all those pretty decorations!
Lovely! I am so glad I passed through from the DIY showoff this morning! I'll be featuring your beautiful party on my saturday shout out! Come check it out! Nice to meet you -shaunna
What an amazing party!
Love the princess-ness! I have two daughters - one super frilly, the other not. The frilly one would LOVE this!!
Very very pretty! It looks like you put a lot of hard work into it - and it paid of! I love the banner! Found your blog from Feature Yourself Friday!
Featuring you again :) What a cute party!
Hi Sarah! I'm featuring your party today - Stop by and grab a feature butoon if you like! Thanks for joining the Celebration Party!
Adorable! Thank you for bringing your hodgepodge to my party! Hope to see you again.
~Gay~
itsahodgepodgelife.blogspot.com
That looks like one AMAZING party!!! Great job!!! You are one incredible woman! Thanks for linking up!
Love all the details you out into her party. It looked beautiful. Thanks for linking up this week. I hope you'll join me tomorrow for another great party!
Such wonderful ideas, glad you linked up to the party so I could find you, would love for you to stop by my party post.
http://texasmonkey.blogspot.com/2009/08/happy-birthday-monkey-themed-birthday_03.html
Look how gorgeous your party is! Love the tissue pom poms and the garland- LOVELY! You've inspired me to make some tissue poms for a shower I'm throwing this weekend... :)
WOW! you totally rock!
Thanks for joining Get Your Craft on Thursday! Please join me next week for another great party!
Wow! I love this party. So elegant and pretty. Perfect for a little princess. Thanks for sharing at 'Look at me, I'm SO Crafty!' at Fun to Craft!!
This whole party turned out so cute!! Thanks for linking up this week!
Thanks for sharing your party how-to's. I would love for you to link it up to my party: http://phubie.blogspot.com/2010/10/get-link-party-started.html
Post a Comment